
The Pi-Desktop Kit add-on board incorporates an association for a mSATA SSD drive. I am will take a gander at including one, and utilizing it for basic circle stockpiling extension and for booting the Raspberry Pi.

In my past post, I expounded on collecting and utilizing the Farnell component 14 Pi-Desktop pack. I restricted that post to the fundamental establishment, setup and utilization of the Pi-Desktop nook itself. Presently I am will take a gander at one of the discretionary development potential outcomes of that pack, including a mSATA SSD (Solid State Disk).
The principal thing to consider, however, is the reason you would need. There are three evident reasons:
Increment circle space, at a superior cost than practically identical smaller scale SD cards. This is likely the best reason, and it truly pays off. The biggest microSD card I have seen so far is 400GB, while mSATA drives up to 1TB are accessible, at a value that is just around 25% higher than the 400GB microSD. Costs for rise to limit are reliably lower for mSATA than microSD.
Enhance execution of the Raspberry Pi. This is most likely the most exceedingly bad reason, and on the off chance that it is your objective you will be disillusioned. This may appear to be interesting at first look, in light of the fact that mSATA speeds (~500MB/sec) are around five times quicker than miniaturized scale SD (~100MBps). The issue is that the Pi-Desktop add-on board interfaces with the Raspberry Pi through USB 2.0, which has a greatest information rate of 60MB/sec.
Dispose of the smaller scale SD card inside and out. This won't not be a high need for the normal Raspberry Pi home client, yet in business and implanted uses the unwavering quality and toughness of smaller scale SD cards can be an issue.

Thus, consider these deliberately when you choose whether you need to do this or not. My own inspiration was a mix of these, in addition to the way this just appeared like a cool and fun activity. Truth be told I got a startling advantage from it - I took in a couple of more things about the Raspberry Pi itself.
The Pi-Desktop add-on board, appeared above, incorporates a mSATA connector and standoff/screw presents on interface and secure a SSD. Note that it will just acknowledge a mSATA module like the one likewise appeared above; both physically and coherently it isn't conceivable to utilize the more up to date M.2 SATA gadgets.

Introducing the SSD is basically an easy decision. Ensure the Raspberry Pi is fueled off (no, don't attempt to "hot swap" it). Slip the connector into put (it just goes one way), and secure the module with the two screws that accompanied the Pi-Desktop unit.
When you boot the Raspberry Pi with the SSD introduced, you likely won't perceive any distinction in the Raspbian desktop.
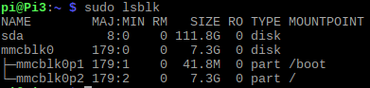
You can affirm that the SSD has been perceived, and discover what name it has been given, utilizing the lsblk summon. Here you can see that the SD card is mmcblk0, and has the boot and root parcels on it, and the SSD has been perceived as sda and has no allotments on it yet.
SSD as extra plate drive
The least difficult conceivable approach to utilize the SSD is similarly as an extra circle drive close by the standard Raspberry Pi small scale SD card. To do this you should segment and configuration the SSD. There are various Linux GUI and CLI utilities for circle administration. I incline toward gparted for this, yet it is excluded in the base Raspbian establishment so I need to introduce it first. That should be possible with the CLI summon:
sudo well-suited get introduce gparted
Obviously on the off chance that you incline toward a GUI bundle director you could likewise go to the board menu, Preferences, Add/Remove Software, at that point seek and introduce it from that point
In the event that you are introducing another (unformatted) SSD; you will initially need to make a parcel table on it. This should be possible with gparted by choosing the SSD starting from the drop gadget list, at that point going to Device/Create Partition Table and after that picking gpt. I see definitely no motivation to utilize the old "msdos" segment table for this situation.
The subsequent stage is to really make at least one segments. I'm not inspired by getting into the contention about filesystem sorts and sizes for SSD drives, however in the event that you are then simply do an inquiry on "Linux SSD" and you will discover a long stretch of time of engaging and once in a while instructive perusing. For my motivations in this basic illustration I made one ext4 parcel that covers the whole drive.

In the wake of making the filesystem, simply reboot and the SSD will be consequently mounted, under the catalog/media/pi/[UUID]. You can see that it is mounted, and where, by running the lsblk summon once more, or by basically floating on the Removable Devices symbol at the correct end of the best board.
Now the establishment and basic setup of the SSD is finished. On the off chance that you like to have it mounted in a more clear place, something like/information, you can add a line to/and so on/fstab for it.
SSD for Raspbian root filesystem
Another probability for designing the SSD is to really move the root filesystem to it. The Pi-Desktop programming bundle incorporates an utility called ppp-hdclone which ought to do this for you.
Lamentably I was not ready to motivate this to work. Truly.
So I at long last surrendered and chose to do what needs to be done myself - it's not advanced science.
Truth be told it is most likely better to do this without anyone else's help, since you have to ponder how you really need to utilize the SSD for this situation. The least difficult way would be to simply make one segment that covers the whole SSD, and afterward duplicate the current miniaturized scale SD root parcel to it. That is really not such an extraordinary thought, however, in light of the fact that you should keep your client records and application information isolated from the root and home filesystem. A superior arrangement is make two allotments, one for the root filesystem and the other for application information.

To do this, take after the strategy above to arrange the SSD, however as opposed to making one filesystem that covers the whole SSD, make one that is no less than somewhat bigger than the current root filesystem on the small scale SD card. You can see that on my framework the root is 7.27GB, so I could make a 8GB parcel on the SSD. However, you can likewise observe that there is 6GB utilized as of now, so that doesn't leave much free space (I am utilizing a 8GB miniaturized scale SD card in this framework). The new SSD has a lot of room, so for what reason not knock up the root segment measure now, and make things more agreeable? I chose to make a 16GB parcel for root.
Presently you simply need to duplicate the substance of the root filesystem from the miniaturized scale SD card to the SSD. Note that in this illustration I am utilizing the gadget names on my framework; they could be diverse on others, so check these with what you see in gparted no doubt.
dd if=/dev/mmcblk0p2 of=/dev/sda1 bs=4M iflag=fullblock oflag=direct status=progress
This duplicate takes a couple of minutes to finish - enough time to get some espresso, however most likely insufficient for a meal break. Yet, what the hell, in the event that you've gotten this far you're still with me, simply ahead and take a meal break - in the event that anybody says something, reveal to them that I said it was alright.
At the point when the dd summon has finished, backpedal to gparted, select the SSD parcel and afterward in the Partition menu picked Check. This will tidy up any irregularities which may have sneaked in amid duplicating, and it will extend the filesystem to fill the segment (since I made the new segment bigger than the old one, recall?). At that point reboot the Raspberry Pi - yes, I realize that a reboot isn't totally fundamental now, yet it will pay off in only a couple of minutes.
In the wake of rebooting you need to roll out two more improvements, to tell the boot procedure and the filesystem table that the root filesystem will be moved.

The boot arrangement is in the document/boot/cmdline.txt, and the parameter you have to change is "root=PARTUUID=xxxxxx". You can locate the new incentive with sudo blkid. Utilize the incentive from the line for/dev/sda1 (duh), and ensure you take PARTUUID, not the basic UUID.
The filesystem design is more dubious, in light of the fact that you need to recall that when you reboot after this, the root filesystem will be the one that you just made on the SSD, not the one which is right now mounted from the small scale SD. This is the reason that I rebooted subsequent to duplicating the root filesystem, in light of the fact that amid the reboot the new segment on/dev/sda1 was naturally mounted under/media/pi/, so now I have simple access to the records on it. So now do this:
sudo vi/media/pi/*/and so on/fstab
Change the line for the root filesystem (/) with the goal that it has the same PARTUUID esteem that you simply put in the boot setup document (cmdline.txt).

That is it! You're prepared to reboot, and the root filesystem will be on the SSD! In the wake of rebooting, here is the thing that that resembles with blkid - you can see that/dev/sda1 is the root filesystem, and/dev/mmcblk0p2 is currently auto-mounted under/media/pi/.
You would now be able to take after a similar method I portrayed in the main segment above, to make a moment parcel on the SSD that uses all the staying free space and either let it automount on/media/pi/[UUID] or add a line to/and so on/fstab to mount it.
SSD totally replaces smaller scale SD
The last option for utilizing the SSD is likewise the most outrageous - totally supplant the miniaturized scale SD card, so the Raspberry Pi really boots from the SSD. The Pi-Desktop documentation for this is somewhat hard to comprehend, no doubt (I would be more disposed to portray it as jumbled). It incorporates a connection to a github Boot From a USB Mass Storage Device report, yet I observed that to be similarly as confounding.
I at last backpedaled to the Raspberry Pi Documentation How to boot from a USB Mass Storage Device on a Raspberry Pi 3. This archive is clear and simple to take after, so I won't rehash those guidelines here. I experienced them and effectively booted from the SSD. Notwithstanding, I kept running into two issues which persuaded me this isn't a valuable design.
Each time the Raspberry Pi boots, there is a 10-15 second postponement while it tries to locate a bootable miniaturized scale SD card. This isn't quite a while, yet before long it gets truly chafing.
In the wake of booting from the SSD and after that introducing the Pi-Desktop add-on bundles, the Raspberry Pi never again boots!
Since the Pi-Desktop was the general purpose of this venture, second one implies that booting from the SSD is impossible. I was astounded to keep running into an issue as genuine as this, particularly in light of the fact that I haven't seen or heard anything about it some time recently. In any case, at that point I backpedaled and re-read the Pi-Desktop documentation, and understood that in the segment titled "Introducing Booting from the SSD" they really say
The default strategy for the Pi-Desktop utilitzes a smaller scale SD card; hence this is the procedure we will concentrate on beneath.
Uh, OK... so the "Booting from SSD" segment depicts... not booting from the SSD? Like I stated, it appears somewhat confused to me. Anyway, it doesn't say the way that truly booting from the SSD and after that introducing the Pi-Desktop programming bundles makes the Raspberry Pi not boot by any stretch of the imagination. On the off chance that any other person has really done this and motivated it to work legitimately, I would be keen on hearing how you oversaw it.
Shouldn't something be said about standard USB drives?
As I was running these tests, and considering the extra board associating by means of USB, it jumped out at me that to the extent the Raspberry Pi is concerned, the SSD is simply one more USB gadget. (Better believe it, I know, I can be somewhat moderate.) What that implies is that every one of the things that I have done as such far with the SSD should likewise be possible with a basic USB plate connected to one of the Raspberry Pi USB ports. Well.

It wouldn't look appallingly exquisite to have a conventional USB stick distending from the side of the Raspberry Pi case, yet there are some pleasant nano-USB drives which are very little more than a knock in favor of the case, and have a decent limit at a low cost. Remember here that in light of the fact that the Raspberry Pi has just USB 2, you wouldn't have to utilize a USB 3 drive for this, either, and USB 2 drives are getting the opportunity to be about as modest as chips!
In this way, I have rehashed the greater part of the means I made up until this point, however with a conventional USB stick as opposed to the SSD, and everything worked the very same way - straightforward extra stockpiling, moving the root filesystem to the USB drive, and notwithstanding booting from a USB stick.
Outline
In the wake of having such a positive involvement with the essential Pi-Desktop unit, I need to state genuinely that I am disillusioned with the consequences of adding a SSD to it. It works, and it has a few favorable circumstances as far as general circle space, unwavering quality and even somewhat better execution. Be that as it may, the execution pick up is no place close what I had (innocently) expected, and the failure to effectively boot from SSD and utilize the full Pi-Desktop usefulness are truly frustrating.


No comments:
Post a Comment